
A very common support request we often get (from schools especially) is asking for assistance with changing a domain name. More specifically, switching the primary domain in a user’s account and moving all of their website data from originaldomain.com to newdomain.com. This means that we have to inform both the hosting platform (WHMCS) and the server (WHM) of the change. Let’s begin, shall we?
Support scenario:
Please change originaldomain.com to newdomain.com for user x. Their email is userx@gmail.com.
Before you Begin:

+ Make sure newdomain.com is actually available to register. Sometimes requests come in to change a domain, but the user hasn’t checked whether or not the domain is available. It will save you tons of steps to check now, as opposed to doing all of the work & then being greeted with a nice big error. The easiest way to check is by going to whois.com. Search the new domain that the user is wanting. If it says the domain is available to register, you’re good to go.
+Vist originaldomain.com in your browser to have an idea of what the website looks like. After you change the domain, you’ll be able to double check that the site looks identical in the new location.
Step one: Finding the Server
Figure out where originaldomain.com is located. While you could go into WHMCS & do a user search and then go to product tab to find out, a quicker (and more fun) way to locate the domain is by SSH via terminal. This option assumes you’ve previously added SSH keys.
ssh root@originaldomain.com
^Press enter. It will ask if you wish to continue connecting. Once you’re in, you’ll see:
root@server [~]#
Boom!
Step Two: Adjustments on the server

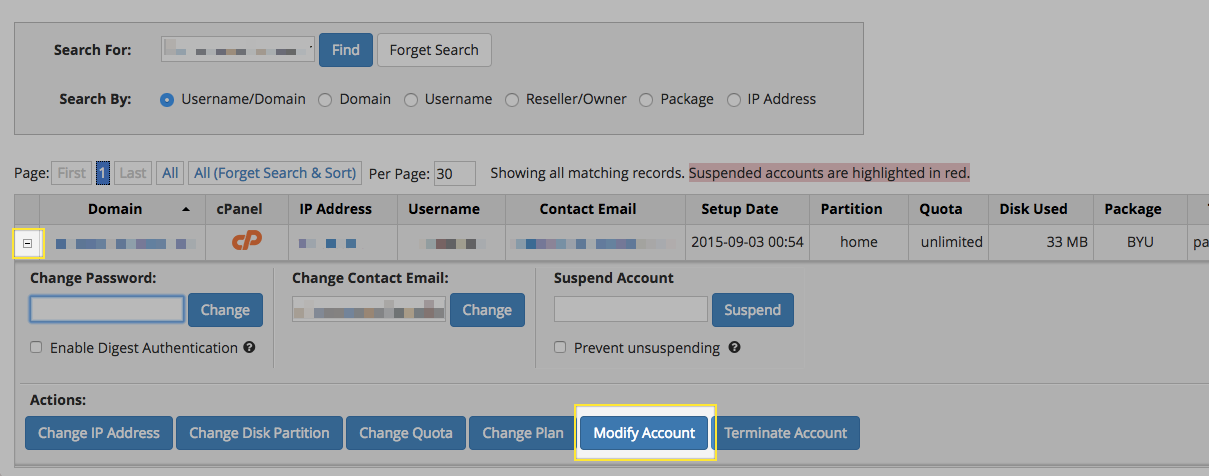
Log into the appropriate server. Search “List” from the left-hand sidebar and click List Accounts. Search for originaldomain.com.
 Click the plus sign next the account to expand your menu options. Click Modify Account.
 Type in newdomain.com. Click Save.
Step Three: Adjustments in WHMCS user Profile
 Go to the user’s account in WHMCS and click on the Product/Services tab. Type newdomain.com into the Domain blank and click Save Changes.
Go to the Domains tab. Type newdomain.com into the Domain blank and click Save Changes.

Now you’ll see that the nameservers are missing. This is because the domain hasn’t actually been registered. To fix this, run the Register module.
You’ll be directed to another page where the nameservers should populate automatically. Click yes to continue with the registration.
Step Four: Syncing

As a final step to make sure all systems & accounts are aligned, I like to run the Change Password Module under the Products/Services tab. This syncs the Client Area Portal with cPanel to give the user a smooth transition into the cPanel dash.