
Yesterday I had a user request that his WordPress blog was converted into a WordPress multisite. Totally doable, but unfortunately Installatron only has the “Easy Button” for a first-time installation, not an installation that already exists. (And nope, cloning won’t work either so don’t even bother.)
Transforming an existing install into a multisite is rather straightforward, but there are a few steps involved. Let’s do this:
Preparing +Installing a Multisite
 You’ll need to start first by editing the local wp-config.php file for the install. This can be done straight from File Manager by going to the install directory, selecting wp-config.php and clicking edit.
 Copy/Paste the following lines into the wp-config.php file above the line that begins with “require_once(”
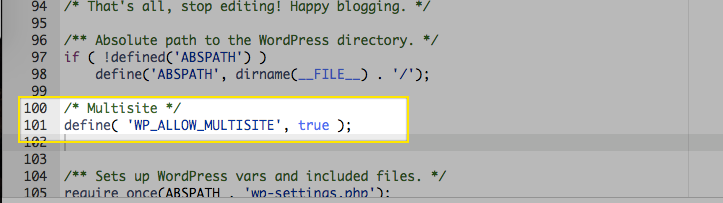
/* Multisite */
define( 'WP_ALLOW_MULTISITE', true );
Once you’ve added the lines, click save.

Now log into your WP dashboard, and deactivate all plugins. Plugins can be reactivated after the multisite switch has been made.

Go to Tools>Network Setup.

Edit the Network Title & Admin Email address if need be, and then click install. You’ll then be given a set of instructions that are pretty self-explanatory, but I’ll go ahead and walk them through here as well!
Editing .htaccess + wp-config.php
Go back to the editing window of your wp-config.php file. Copy/Paste the following code above the line that says /* That’s all, stop editing! Happy blogging. */ Replace yourdomain.com with your domain.
define('MULTISITE', true);
define('SUBDOMAIN_INSTALL', true);
define('DOMAIN_CURRENT_SITE', 'yourdomain.com');
define('PATH_CURRENT_SITE', '/');
define('SITE_ID_CURRENT_SITE', 1);
define('BLOG_ID_CURRENT_SITE', 1);
Once you’ve added the lines, click save.

We’re now going to edit the local .htaccess file. This file is considered a hidden file in your File Manager, so if you’re not seeing it right off the bat, go to Settings in the top right corner, check Show Hidden Files, and click save.
 Now open the editing window of the .htaccess file in the corresponding directory of the domain you’re working with. Add the following code, replacing all existing WordPress rules.
RewriteEngine On
RewriteBase /
RewriteRule ^index\.php$ - [L]

# add a trailing slash to /wp-admin
RewriteRule ^wp-admin$ wp-admin/ [R=301,L]

RewriteCond %{REQUEST_FILENAME} -f [OR]
RewriteCond %{REQUEST_FILENAME} -d
RewriteRule ^ - [L]
RewriteRule ^(wp-(content|admin|includes).*) $1 [L]
RewriteRule ^(.*\.php)$ $1 [L]
RewriteRule . index.php [L]
Once you’ve added the lines, click save.
Adding a Wildcard Subdomain
In a non-Multisite scenario, creating an additional WordPress site involves installing the WP app, but also making sure that the location (i.e. subdomain or addon domain) has been created beforehand. There’s that extra step where you have to tell your cPanel where you’ll be installing WordPress before you actually do it.
A WordPress Multisite is self-service in the sense that you can create a WordPress site straight from the WP Multisite dashboard without dealing with other aspects of the cPanel. To achieve this, however, you have to tell your cPanel right from the get go: “Hey, I’ll be adding subdomains. I’m not sure what they are yet, so just accept all future subdomains that I create.” This is accomplished by creating a wildcard subdomain in your account.

From your cPanel, go to the Domains section and click on Subdomains.

- In the subdomain section, type an asterisk.
- In the domain section, select yourdomain.com from the drop-down menu
- Change the document root to match the directory of yourdomain.com
- Click create.
The last step
We’re almost there! You’ll need to Log out/Log back into your WP Multisite. Reactivate your plugins. Boom diggity.
Lauren, thanks so much for posting this. I tried it and everything works EXCEPT – when I add a new site to my multisite, I get a server not found error for that new site. I can’t open the admin panel for the second site I added either. The original site still works.
original site
http://newwp.stacyzemke.org
added site
http://edupreneurlifter.newwp.stacyzemke.org
I have tried twice from scratch – and same issue.
Stacy Zemke